Posts

Showing posts with the label Basics

Basic Lentils

Image
This is a basic lentil recipe that can be used for brown or green lentils. Other lentils will require different cooking times. I only use this recipe when I need to use the lentils in another recipe where the lentils needed to be cooked prior to use. Basic Lentils 1 cup lentils 2-3 cups vegetable stock Place lentils and vegetable stock in pan making sure lentils are covered with stock. Cook 20-30 minutes until lentils are tender. Add more stock or water if lentils aren't getting tender as the stock is absorbed.   Drain excess liquid unless it is required for the recipe. Use as required in recipe. Note: I use organic ingredients whenever possible. Disclosure: This blog contains affiliate links meaning if you click on those links and make a purchase, I earn a commission at no additional cost to you. To learn more about me and my work, please visit,  www.tlcooper.com .

Basic Quinoa

Image
I often make quinoa to serve with the entrees I make for dinner yet it only recently occurred to me to share the recipe on here. Quinoa is healthy and tasty. It's also quicker to make than rice, and works as well with many dishes. I also make quinoa as an entree similar to a rice pilaf. Basic Quinoa 1 cup quinoa 2 cups stock * Place quinoa in a medium saucepan . Pour stock over the quinoa. Bring to a boil. Turn down heat to a simmer. Let cook until the water is absorbed, approximately 15-20 minutes. The quinoa will expand in size and appear to have little rings in it.** Turn off heat. Gently spoon into bowl or bowls. Serve. * You could also make this with water, but stock adds a greater depth of flavor. **Some recipes call for fluffing the grains with a fork; however, I've never found it made that big of a difference. You can if you want though. Note: I use organic ingredients whenever possible.

Cashew Butter

Image
Cashew butter is a great nut butter to use as a base for other recipes. I rarely use it as a spread, but it also works well in that capacity. Cashew Butter 4 cups cashews Pour cashews in a food processor .  Pulse 4-6 times. Process until cashews are smooth and creamy. Spoon in a glass jar. Store in the refrigerator. Note: I use organic ingredients whenever possible.

Basic Rice

Image
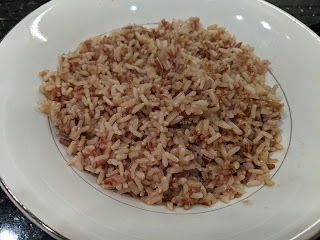
Rice is such a staple that it hadn't occurred to me to share a recipe before now. As I cooked rice to accompany this week's recipe, I realized I needed to share my rice recipe. Basic Rice 1 cup rice* 2 cups vegetable stock ** Add rice to a pan . Cover with stock. Bring to a boil. Let boil until stock is just below the rice.  Reduce heat to simmer. Simmer until all the rice has absorbed all the liquid. Depending on the type of rice this can take anywhere from 30 minutes to 50 minutes. Serve. * I used Volcano Rice for this particular meal. It's one of my favorite rices. But the same idea works with brown rice, black rice, jade rice, and a host of other rices. I avoid eating white rice because it's not healthy. ** I prefer to use stock in this recipe, but water will work just as well. The stock elevates the flavor and adds a bit more depth to the nutritional value. Note: I use organic ingredients whenever possible.

Chickpeas, Just Chickpeas

Image
This very basic chickpea recipe is for cooking chickpeas to be used in other recipes. I cook them with water because it makes them more versatile. Stock can give them a more savory flavor that won't work in desserts, such as Chocolate Chip Chickpea Blondies . One savory option is Chickpea Mushroom Korma . Chickpeas 2 cups dried chickpeas 6 cups water 1 bay leaf * 6 cups of water Place chickpeas in a bowl . Cover with 6 cups water. Cover the bowl.  Let soak at least 8 hours or preferably overnight. Chickpeas will expand in size considerably as they re-hydrate. Drain chickpeas. Cook using either of the two methods listed below. Method 1 – Crockpot **: Place chickpeas in the crockpot. Add 6 cups of water. Add bay leaf. Cook for 8 hours until soft. Method 2 – Stovetop: Place chickpeas in a large pan . Add water (you might need more water with this version). Add bay leaf. Bring to a boil. Lower heat to medium-low and cook for 1....

Sourdough Starter

Image
This week's recipe is a little different than usual. This is my fifth or sixth attempt at keeping a sourdough starter working. The first few attempts offered mixed results, but I learned from each one. Sourdough Starter is a commitment. That is the first thing anyone attempting to start a sourdough starter needs to understand. It's not something you only pay attention to when the mood strikes. It needs daily attention. My latest Sourdough Starter has been going strong for at least a year and a half now, maybe closer to two years. I don't remember exactly when I started it. That's the longest I've had one survive, but I know that I could easily kill it with just a few days of neglect. Sourdough Starter Organic Whole Wheat Flour Water* Patience Persistence Day 1: 2 cups organic whole wheat flour 2 cups water Place flour and water together in a jar or canister with a loose lid. The mixture needs air to do its work, so do not seal the...

Pecan Butter

Image
When I decided to make a pumpkin pie (recipe coming soon) for Thanksgiving I wanted a "traditional" crust for it, but I wanted it to be both vegan and healthy. I did a little research on various traditional crust recipes as well as vegan pie crusts and eventually decided I wanted to try replacing the "fat" in the crust with a nut butter. I particularly like pecan with pumpkin, so I decided to try making a crust using pecan butter. That meant I needed to make pecan butter. I looked at my previous nut butter recipes and did a little research on pecans. Then I came up with this. It worked really well! Tasty! I used what I didn't need for the crust (recipe coming next week) to make a salad dressing (if I can replicate it I will share it, but I didn't write it down at the time.) later and it was delicious! Pecan Butter 2 cups pecans Preheat oven to 350 degrees. Bake pecans 5-6 minutes until lightly browned. Cool 5-10 minutes. Pr...

Walnut Milk

Image
Every time I post a recipe I think of a building block recipe like Walnut Milk, I feel like I should post more recipes than one. This time however, I'm going to fight that urge. These recipes, though building blocks, can also be used as stand alone recipes for those who use or drink nut milks. Most nut milks are fairly similar. Walnut Milk 1 cup walnuts 4 cups water Place walnuts in a small bowl and pour water over the almonds. Allow to soak 8-12 hours. Place walnuts and soaking liquid in a blender, such as a  Vitamix . Add 4 cups of water. Blend until the liquid turns white increasing the speed slowly. Place a  nutmilk bag  in a pitcher and pour blended walnut mixture into the nut milk bag. Twist the bag wringing out as much liquid as possible. Place walnut pulp* from the nut milk bag into an airtight storage container. It can be refrigerated or frozen for later use. Pour the walnut milk into an airtight container. Refrigerate. ...

Raw Cinnamon Applesauce

Image
As I said, this week I'm doing a 2-for-1 in the recipe department. I shared my basic Raw Applesauce recipe, and this is my Raw Cinnamon Applesauce Recipe. They're both very easy and can be made with a few apples or a blender full of apples. Just adjust the cinnamon accordingly. Raw Cinnamon Applesauce Apples 2 teaspoons cinnamon for every 8 cups of apples Wash apples. Core and slice into pieces cutting out any bad spots. Sprinkle cinnamon over apples and mix to coat. Fill blender with apples. Slowly increase speed on blender until blending on high. Blend until smooth pushing apples down when necessary. Place in airtight containers and place in the refrigerator.  Can be frozen for longer storage if necessary.

Raw Applesauce

Image
This week I'm sharing two very similar recipes Raw Applesauce and Raw Cinnamon Applesauce . They weren't my planned recipes, but when I discovered enough apples on our apple tree, I decided to go ahead and make applesauce and share the recipes. This is a basic raw applesauce. I don't specify the number of apples because I've made this recipe with as few as 2 apples when I needed applesauce for a recipe I was making or a full blender full of apples like this time. Raw Applesauce   Apples Wash apples. Core and slice into pieces cutting out any bad spots. Fill blender with apples. Slowly increase speed on blender until blending on high. Blend until smooth pushing apples down when necessary. Place in airtight containers and place in the refrigerator.  Can be frozen for longer storage if necessary.

Cashew Milk

Image
Nut milks are great for a variety of purposes. I like different ones for different recipes. I made cashew milk to test in a recipe I'm working on in which other nut milks seem to overpower more delicate flavors. It also worked wonderfully to make a cold brew latte . Variety is important as is knowing how ingredients interact with one another. Many times nut milks and other plant-based milks can be easily substituted for one another in a recipe. It's important though to know how the flavors will interact with one another when making substitutions. Sometimes the only way to find out is to experiment, so play with the options. That's right I'm encouraging you to play with your food. Cashew Milk 1 cup raw, unsalted cashews 4 cups water Soak cashews overnight. Pour cashews and soaking water into blender . Blend, slowly increasing speed to high, until well blended. Place a nut milk bag in a large mouthed pitcher . Pour liquid into nut mi...

Almond Butter

Image
Just like I assumed for peanut butter, I assumed almond butter involved some intense, time consuming process. I was surprised to figure out just how easy it is.  It can add a step to a recipe because you have to make the nut butter before you can use it in a recipe instead of just opening a jar, but it's worth the effort, time, and planning.  Freshly made nut butters taste fresher and intenser than most jar nut butters. It also allows you to control what goes in a nut butter. The vast majority of nut butters only need one ingredient, the nuts.  Almond Butter 4 cups raw, unsalted almonds Heat oven to 350 degrees. Spread almonds on a sheet pan . Place in oven. Roast for 15-20 minutes until begin to turn brown shaking a few times throughout baking time to make sure they’re roasting evenly. Cool in pan at least until they are cool enough to handle comfortably. Transfer nuts to a food processor . Pulse a few times to make sure they’re even...